How To Integrate Klaviyo with Stannp: A Step-by-Step Guide
Are you ready to elevate your marketing campaigns by combining the power of Klaviyo and Stannp.com? With this integration, you can effortlessly...
%20(Landscape))%20(4).png)
Want to supercharge your marketing by combining HubSpot's CRM capabilities with Stannp's direct mail services? Follow this guide to set up an automated workflow in HubSpot that triggers personalised direct mail campaigns using Stannp.
Before we get started, check out this helpful video tutorial for additional guidance:
4.1 Enter the URL
Enter the URL of Stannp's API endpoint for sending letters:

4.2 Set up authentication
3. In HubSpot, set the API key name to api_key (all lowercase)
4. Set the API key location to Query Parameters
This is where you define the details of your direct mail campaign
1. Click Customise Request Body to add your parameters
2. HubSpot allows you to add either dynamic properties (pulled from your contact data) or static values. Here's a breakdown:
Example Parameters
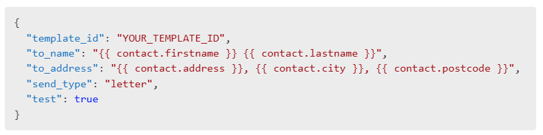
For more advanced parameters and custom variable options, refer to Stannp's API Documentation
Testing is a crucial step to ensure everything is set up correctly:
1. Set the test parameter to true
2. Run a test request. Stannp will return a fake response, allowing you to:
3. No charges will be applied, and nothing will be sent
Once you're satisfied with your setup:
1. Change the test parameter to false
2. Activate your workflow in HubSpot
Your HubSpot workflow is now ready to trigger Stannp's direct mail campaigns automatically!
By integrating HubSpot with Stannp, you'll unlock a powerful combination of email and direct mail marketing. Deliver a seamless multi-channel experience to your audience and make your campaigns stand out. Happy sending!

Are you ready to elevate your marketing campaigns by combining the power of Klaviyo and Stannp.com? With this integration, you can effortlessly...
Stannp.com can be used with Zapier to automate sending your Direct Mail. For instance, you can trigger sending Direct Mail when events happen within...
Looking to streamline your direct mail campaigns? With Make.com, it's easier than ever to connect Stannp.com with thousands of apps - without the...